T110 Rebuild

This blog is about the rebuild of my Dads Triumph T110 after being in "boxes" for 39 years!


Friday, December 30, 2011

Day 5 - Engine

Today the mounting surfaces of the head were faced on a granite block with sand paper glued to it - using 80 grit.

The 2 engine casings were washed in parrafin to get rid of greasy residue, then high pressure blasted to make sure there was no residuel grit in the bearings, and then the studs were put in.


The new valve guides were pressed into the head, and they were lightly laped to ensure the valve fitted smoothly. Then the seats where cut. Then valve seat grinding began, this is quite a lengthly process requiring valve grinding paste and a suction cup, then spinning the suction rod between your palms to grind the valve seat, after a while it is then checked with blue marking paste to check where the seat is resting - and then the process resumes until there is a perfect seat the whole way round.

Valve guides about to go in

Sanding the guides slightly

Valves assigned to there positions and numbered

Cutting the valve seats

Grinding the valve seats for a perfects "fit"

Checking with marking blue to make sure the seat is all round  - this one needs some more grinding!
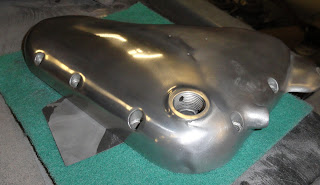
The ali. covers had there bolt head holes opened up by ,5 mm to take the new case bolts, had a final polish and then were washed in thinners to get rid of any polishing residue, they are now ready for clear painting.

The gear box gears and parts were vapour blasted and oiled to prepare them for the re-assembly of the gearbox.

The oil release valve was taken to pieces, vapour blasted and then re-assembled, the small piston was stuck inside, but after some persuation released and moved freely. Then the valve was re-assembled.

The cam follower guides were pressed into the barrel and there locating nuts put in place, then the cams were located.


Thursday, December 29, 2011

Day 4 -Engine

The head was blasted more to try and clean it more, switching from bead to sand shot helped, we also tried heat the old gunk with a flame to get rid of it easier, finaly the head was vapour blasted and it came suitably clean. Old valve guides were also pressed out.


Burning the gunk.


Mounting surface sanded - rust forming already.

The engine and gearbox casings were vapour blasted then placed in a hot oven to seal - creating an oxidisation layer. Once removed from the oven and still hot they had the bearings pressed in as well as the brass bushes and timing guide. Some of the camshaft bushes had to be lapped, which Roger made a special tool on his lathe to align the casing and lap the bush - worked very well.
Mounting surfaces sanded
Sanding "stone"

Using my sister-in-laws oven ;-)

Come out a bit HOT!

Bushes going in while still hot.


Note the essential oven mitts.

Bearings going in too.


Bushes being lapped on the lathe.


Two stud holes on the casings had been stripped, so they were bored bigger and a threaded insert was made to get the holes back to original size.

Drilling out the stud hole.

New insert in and new thread cut for the plated stud

Further plating on bolts, studs and nuts was done. An issue was also found with the crank bolts - they are pitted and corroded so new ones will be needed.
Plated bits

Wednesday, December 28, 2011

Day 3 - Engine

More time was spent on sanding the covers, taking the grit down and finer to 360 then 600 we also used 2 scouring type pads to smooth even more. The 600 grit was water flatted. After flating, polishing could begin - we used the large poilishing wheel with rouge and the results were quite spectacular. While polishing the covers heat up quite extensively.

Halfway through 600 grit


Trying out the polishing wheel


Half and Half

Straight after polishing
Many of the engine studs needed to be re-plated, so Craig had a job working on these, they were first pickled in acid to get rid of rust and coating, then they were vapour blasted to get rid of dirt buildup in the threads, then it gets wired and submerged in the electro-plater for the required amount of time then it gets neutralised and they come out looking like new.

The results - post plating
For the conrods the test machining process of the previous day worked very well so Roger repeated the process on the actual 2 con. rods we are going to use. The tops were flatted to take them down a size then they were milled to take away the oval, then checked with marking ink to check surface fit and edges chamfered to get this fit precise - quite a precise and timely process.


Once conrods were resized the rough edges on the shafts were filed to smooth them out and reduce possible weakness in the future. They were then sanded to smooth the filing marks, bead blasted and then vapour blasted for a brand new look.


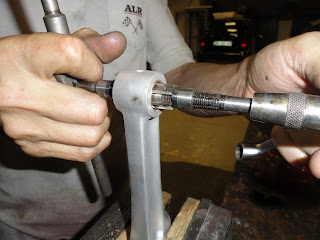
The top brass bushes then needed to be pressed in which was done with heating the con rod end with a flame and clamping down the bush to press it in. Once they were pressed in the bushes were reamed so there was a good fit with the gudgeon pins.


In the engine casing the cam shaft bushes neede to be removed , this was done by threading a large tap into them, heating the casing with a flame and drifting the bushes out.


My nephew Michael working on metal bead blasting the head which is cast iron, but someone liked the idea of it being alluminium so drenched it in some kind of silver paint. Over the years all the paint has gathered in the fins and has proved quite difficult to get out. In the end we resorted to scraping it out with a marking pick.


The engine gears were vapour blasted to get them back to new and then sprayed with some lubricant so as not to attract rust.


We also started working on getting the casings true and even on the mounting edges so as to ensure a good seal between casings. We used 80 or 100 grit sand paper roll glued to a marble base, and then sanded.