Stumbled across this article a month or 2 ago and realised I hadn't posted it. The T110 still making cover pages ;-)
Its the August 2016 edition of THE CLASSIC MOTORCYCLE MAGAZINE.
Great article to read, an original T110 owner who sold his bike in the 60's and to get it left to him in a will almost 40yrs later.
Great photos of detail and original photos and documentation. Grab a copy if you can.
Here some images:
T110 Rebuild
This blog is about the rebuild of my Dads Triumph T110 after being in "boxes" for 39 years!
Showing posts with label T110. Show all posts
Showing posts with label T110. Show all posts
Monday, November 21, 2016
Cover Pages
Thursday, March 27, 2014
A visitor
Today I had a visit from a fellow T110 builder from Klerksdorp in South Africa.
I was put in contact with Kelly through his son in Canada who stumbled upon this blog.
It was good to exchange info and compare parts, brackets and mounting points. It is amazing how the parts on these old triumphs are so interchangeable and how over the years you are not always to sure what you are left with is still original.
It was also encouraging to find out Kelly has traced down two other T110s in South Africa which are restored, and he is planning on paying them a visit sometime.
Keep us posted Kelly.
Good meeting you.
:-)
Saturday, March 22, 2014
Panel beating and the TIG
After priming the mudguards etc. the next step is to fill in some unwanted holes, and cracks which had become evident after the sand blasting. Roger arranged for us to visit a friend with a TIG welder (Thanks Russell). Was an interesting learning curve, but success was achieved with only minor "sunburn" :-).
The front mudguards had quite big gaps in them on either side, not sure if it was purely from wear or if a modification had been done at some time in its past. Anyway the gaps needed filling. Cut some small mild steel filler pieces. Welded them in and then ground them down.
 |
| Figuring out this TIG thing |
 |
| The Gap |
 |
| Filler Piece |
 |
| Welded and cleaned up slightly |
Also had a lesson on how to start work out some of the many dings and dents in the mudguards - clearly they have had a colourful and adventurous life up until now. Here is a picture of a small part of the front mudguard.
Saturday, February 1, 2014
Sand blasted tins
Got a call this morning to collect the sand blasted tins. They cleaned up very nicely can see all the dings, and found a cracked bracket on the oil tank.
Wednesday, January 29, 2014
Tins ready for blasting
Got the tins ready to go to sand blasting. Removed the unnecessary bolts and brackets. Plugged the threaded holes with dowels. Handed them in this morning, will see how it turns out.
Wednesday, November 6, 2013
Steering head
Quite excited to recieve the steering head set in the post today. Bought it off ebay from Supreme Motorcycles.
I can now see I had quite a few bits missing from my bike. The part is a L.F.Harris part.
Hoping to get a chance to fit it during the end of the year break.
Wednesday, December 28, 2011
Day 3 - Engine
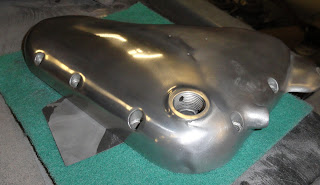
More time was spent on sanding the covers, taking the grit down and finer to 360 then 600 we also used 2 scouring type pads to smooth even more. The 600 grit was water flatted. After flating, polishing could begin - we used the large poilishing wheel with rouge and the results were quite spectacular. While polishing the covers heat up quite extensively.
Many of the engine studs needed to be re-plated, so Craig had a job working on these, they were first pickled in acid to get rid of rust and coating, then they were vapour blasted to get rid of dirt buildup in the threads, then it gets wired and submerged in the electro-plater for the required amount of time then it gets neutralised and they come out looking like new.
For the conrods the test machining process of the previous day worked very well so Roger repeated the process on the actual 2 con. rods we are going to use. The tops were flatted to take them down a size then they were milled to take away the oval, then checked with marking ink to check surface fit and edges chamfered to get this fit precise - quite a precise and timely process.
Once conrods were resized the rough edges on the shafts were filed to smooth them out and reduce possible weakness in the future. They were then sanded to smooth the filing marks, bead blasted and then vapour blasted for a brand new look.
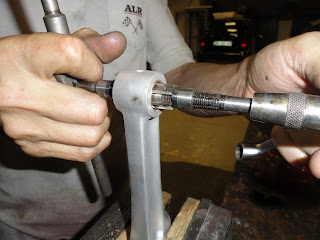
The top brass bushes then needed to be pressed in which was done with heating the con rod end with a flame and clamping down the bush to press it in. Once they were pressed in the bushes were reamed so there was a good fit with the gudgeon pins.
In the engine casing the cam shaft bushes neede to be removed , this was done by threading a large tap into them, heating the casing with a flame and drifting the bushes out.
My nephew Michael working on metal bead blasting the head which is cast iron, but someone liked the idea of it being alluminium so drenched it in some kind of silver paint. Over the years all the paint has gathered in the fins and has proved quite difficult to get out. In the end we resorted to scraping it out with a marking pick.
The engine gears were vapour blasted to get them back to new and then sprayed with some lubricant so as not to attract rust.
We also started working on getting the casings true and even on the mounting edges so as to ensure a good seal between casings. We used 80 or 100 grit sand paper roll glued to a marble base, and then sanded.
 |
| Halfway through 600 grit |
 |
| Trying out the polishing wheel |
 |
| Half and Half |
 |
| Straight after polishing |
 |
| The results - post plating |
Once conrods were resized the rough edges on the shafts were filed to smooth them out and reduce possible weakness in the future. They were then sanded to smooth the filing marks, bead blasted and then vapour blasted for a brand new look.
The top brass bushes then needed to be pressed in which was done with heating the con rod end with a flame and clamping down the bush to press it in. Once they were pressed in the bushes were reamed so there was a good fit with the gudgeon pins.
In the engine casing the cam shaft bushes neede to be removed , this was done by threading a large tap into them, heating the casing with a flame and drifting the bushes out.
My nephew Michael working on metal bead blasting the head which is cast iron, but someone liked the idea of it being alluminium so drenched it in some kind of silver paint. Over the years all the paint has gathered in the fins and has proved quite difficult to get out. In the end we resorted to scraping it out with a marking pick.
The engine gears were vapour blasted to get them back to new and then sprayed with some lubricant so as not to attract rust.
We also started working on getting the casings true and even on the mounting edges so as to ensure a good seal between casings. We used 80 or 100 grit sand paper roll glued to a marble base, and then sanded.
Tuesday, December 27, 2011
Day 2 - Engine
Today more time was spent on sanding out the engine covers, to remove blemish using 100 and 180 grit. Some covers required the use of a rough file and dremel to work on the deep gouges.
The flat faces were also sanded on a flat block to level the mounting edges.
The original connecting rods did not use shells, so these need to be milled so as to fit onto the newly polished journals. Quite some time was involved in truing and setting up the milling machine, there after a spare con. rod was used as a tester to get the process correct - it was found that the edges needed to be chamfered quite a bit after the milling had been done to unsure the correct seating of the con. rods.
 |
| Areas where more work was needed have been marked up. |
The original connecting rods did not use shells, so these need to be milled so as to fit onto the newly polished journals. Quite some time was involved in truing and setting up the milling machine, there after a spare con. rod was used as a tester to get the process correct - it was found that the edges needed to be chamfered quite a bit after the milling had been done to unsure the correct seating of the con. rods.
 |
| Main engine casings were also vapour blasted. |
Subscribe to:
Posts (Atom)


